

There is something special about picking a ripe strawberry straight from your own garden and tasting the sweetness while it is still warm. Homegrown strawberries are fresher and more flavorful than anything you can buy at the store.
The best part is that they are easy to grow once you know a few important basics. In this guide, we’ll cover:
- Essential tips for growing huge strawberry harvests
- The crown depth trick and why you should pinch off your first flowers
- How to shield your strawberries from pests and diseases
- Learn the critical planting depth and more
Choosing The Perfect Variety
Choosing the right strawberry variety affects how much you harvest and how the berries taste. Here are the most common types:
June-Bearing
These varieties produce one large crop over a 2-3 week window in early summer. These are the biggest, most flavorful berries, and preferred for making jams, jellies, and freezing. Popular varieties include Chandler, Earliglow, and Allstar.
Since these berries often peak at the same time as other summer staples, I invite you to read our guide on how to grow garlic plants here.
Everbearing
The everbearing types yield 2-3 separate crops; late spring, early fall, and sometimes midsummer. They don’t deliver as heavily as the June-bearing. Ozark Beauty and Quinault (ideal for containers) are widely available choices.

Day-Neutral
Day-neutrals are not triggered by day length. Varieties like Seascape and Albion, which are disease-resistant, consistently generate strawberries unless temperatures drop below 35°F or rise above 85°F. If you live where summer temperatures stay above 85°F for long periods, these may not be the best choice.
Wild Strawberries (Fragaria vesca)
Sometimes called alpine strawberries, these types are lower-maintenance plants that produce small, intensely flavored berries throughout the season.
If your goal is a large harvest all at once, choose June-bearing. If you would rather pick berries over a longer time, everbearing or day-neutral types may suit you better. For smaller, very flavorful fruit, alpine strawberries are well worth considering.
Step #1: Sunlight, Soil & Drainage
Strong plants start with the right sunlight, soil, and drainage.
Light Requirements
Strawberries are sun-loving plants, requiring a minimum of six hours of sunlight, with eight to ten hours preferred. More sunlight usually means sweeter, more flavorful fruit.
Soil Requirements
Strawberries prefer a soil pH of 5.5 to 6.5, which is slightly acidic. Getting your soil right before planting will pay off for the life of the bed.
Outside of this pH range, even nutrient-rich soil can leave plants unable to absorb what they need. This translates to poor growth and disappointing crops. Testing your soil pH before planting is highly recommended and inexpensive.

The Basics of Adjusting pH
- To lower pH and make soil more acidic, incorporate elemental sulfur several weeks before planting
- To raise pH and make soil more alkaline, add ground limestone
Organic matter, like compost, is the best product you can add to your beds. Working it two to four inches into the top 12-inches of soil improves both water drainage and water retention. Compost also adds beneficial microbial activity and provides a slow-release source of nutrition. This is one preparation step that is always worth the effort.
Drainage
Proper drainage is just as crucial as watering correctly. Strawberry roots are sensitive to standing water and risk root rot if they sit in wet soil. If your garden has heavy clay soil or low-lying areas, raised beds or containers are your best solution.
5 Steps For Soil Prep
- Target pH: Maintain 5.5–6.5 (slightly acidic) to ensure proper nutrient absorption.
- Test Soil: Check pH before planting to identify necessary adjustments.
- Adjust pH: Add elemental sulfur to lower pH or limestone to raise it several weeks before planting.
- Amend with Compost: Mix 2–4 inches of organic matter into the top foot of soil for better drainage and nutrition.
- Ensure Drainage: Use raised beds or containers in heavy clay or low areas to prevent root rot from standing water.
Step #2: Selecting The Best Plants
Buying plants from a reputable nursery is an essential step for a successful crop, since they are usually certified as disease-free. Potted transplants or bare-root plants will establish roots and yield fruit their first season, especially everbearing and day-neutral types.
I prefer bare-root plants, which are sold in bundles of 25. Keep them dormant in the refrigerator until planting time, then soak the roots for about two hours, trim them to roughly 3 inches, remove dead foliage, and plant.
When selecting green potted plants, look for firm, healthy crowns with robust root systems. Avoid plants with spots on the crown, mushy roots, or signs of wilting, which are a sign of poor roots.
Step #3: Growing From Seed: Sowing and Seedling Care
Growing strawberries from seed takes longer than planting crowns or runners, but allows you to have a wider range of varieties, including heirloom and alpine types.
For best germination, give the seeds a cold period (stratification) before sowing. The easiest way is to place the seed packet in the refrigerator for 4-6 weeks. This helps break dormancy and improves germination.
Seed Starting Essentials
- Cold: Refrigerate seeds for 4–6 weeks to break dormancy.
- Surface Sow: Press seeds into moist mix, don’t cover, and provide light.
- Thin/Transplant: Move to pots and thin to the strongest seedling after 3 true leaves appear.
- Time & Feed: Start 12–14 weeks before the last frost and use light liquid fertilizer.
- Buy seeds: Source from good suppliers so plants grow true to type.
After a cold period, sow the seeds on the surface of a fine, pre-moistened seed-starting mix. Because strawberry seeds need light to germinate, do not cover them with soil. Gently press them into the surface, mist lightly, and place them under grow lights or in a bright window.
Seeds typically germinate in 2-6 weeks. Once seedlings have three or more true leaves, transplant to individual pots. You can also start them in cell trays or six-packs. After true leaves appear, thin to one seedling per cell. Keep the strongest one and cut the others off at soil level. Cell trays avoid root disturbance and transplant shock.
Once the seedlings are established, feed them lightly with liquid fertilizer.
If you want berries in the first year, start seeds 12-14 weeks before your last frost date so the plants are ready to go outside as early as possible.
Expert Tip: Purchase professionally processed seeds from a reputable supplier; seeds saved from store-bought berries often exhibit seedling variability, meaning they won’t grow true to the parent plant.
To explore growing larger fruit from scratch, see our beginner’s guide on starting avocados here.
Step #4: Planting Strawberries (When & How)
When do you plant strawberries? It depends on your climate:
- Cool climates (Zones 3–6): Plant in early spring, as soon as the soil can be worked.
- Warm climates (Zones 7–10): Plant in fall to avoid the stress of summer heat during establishment.
Spacing and Depth
Space plants 12-18 inches apart, with rows 3-4 feet apart. It may seem wide at first, but the plants will fill it in with runners, eventually.
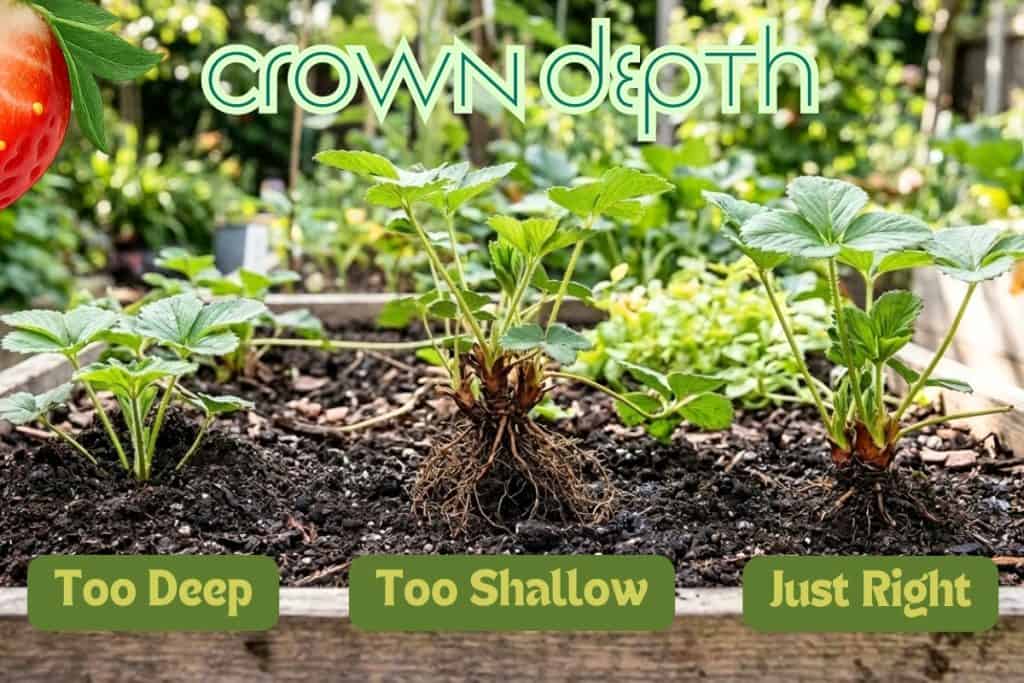
Planting depth is important, especially for bare-root plants. The crown, the thick, slightly woody part between the roots and leaves, should sit right at soil level.
If the crown is planted too deeply, it can rot; too shallow, the roots may dry out. If you are unsure, plant slightly high. This is one of the most vital details when planting strawberries.
After planting, water deeply and thoroughly to settle the soil around the roots and remove air pockets.
Mulching Right After Planting
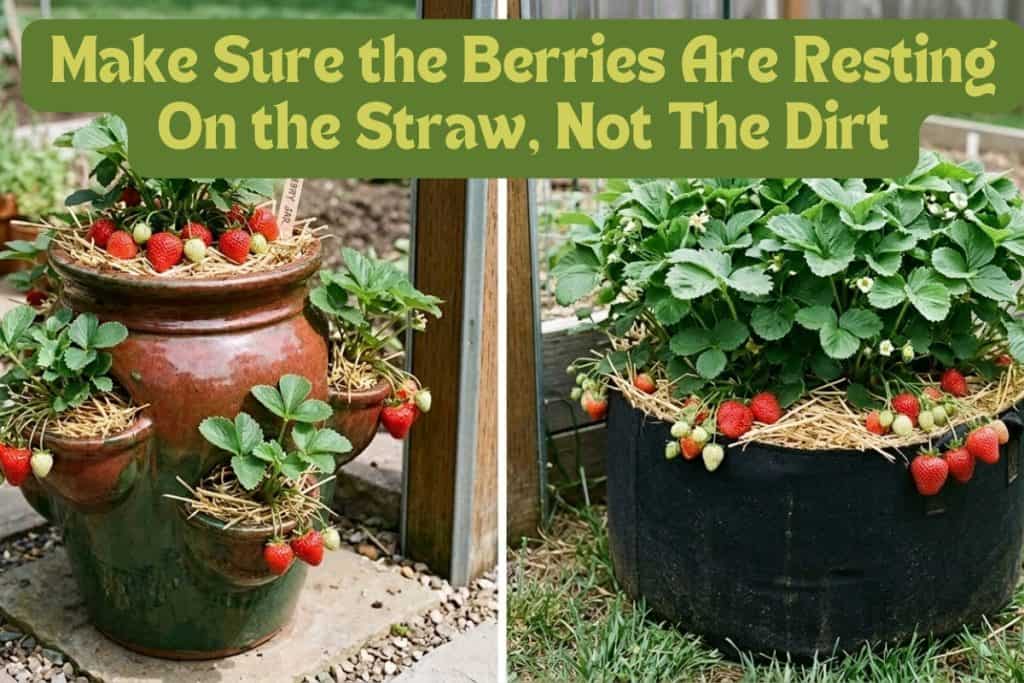
Right after planting, apply 2-3 inches of straw mulch around the plants. Straw helps regulate soil temperature, keep moisture between waterings, suppress weeds, and keep developing berries off the soil. That means cleaner berries and less risk of rotting.
5 Steps To Planting And Mulching
- Timing: Plant in early spring for cool climates or during the fall in warmer regions to avoid heat stress.
- Spacing: Place plants 12–18 inches apart with 3–4 feet between rows to allow runners to fill the space.
- Position the Crown: Ensure the woody crown sits exactly at soil level to prevent either rotting or root dehydration.
- Watering: Soak the area thoroughly right after planting to remove air pockets and settle the earth around roots.
- Straw Mulch: Spread a 2–3 inch layer of straw to regulate temperature, suppress weeds, and keep berries off the ground.
Step #5: Container Strawberries
One advantage of strawberries is how well they grow in containers. If you have limited space or difficult soil, pots and bags are an excellent option because they give you complete control over soil and drainage.
The right container matters more than most guides suggest. A strawberry pot should be at least 12 inches deep, so the roots have enough room to expand. Classic strawberry jars with side pockets save space, but they require closer attention to watering.
Container Growing Basics
- Drainage: Choose fabric bags or baskets for superior moisture control.
- Containers: Use 12-inch pots for proper root expansion and health.
- Potting Mix: Avoid garden soil to prevent compaction and disease issues.
- Low-Nitrogen: Prioritize flowering and fruiting over excessive foliage growth.
- Winter: Move dormant pots to unheated shelters during hard freezes.
Hanging baskets lined with sphagnum moss work well for everbearing varieties, creating a nice cascade of fruit. The downside is they dry out quickly in warm weather.
Fabric grow bags (sold as upside-down bags) hold moisture better, drain well, and air-prune the roots, which encourage a healthier root system.
Potting Mixes
Use a high-quality mix; never use garden soil. Garden soil compacts in containers, slows drainage, and can introduce pests and diseases.
Most potting mixes already contain slow-release fertilizer that lasts for 3-6 months. If yours doesn’t, mix in a slow-release fertilizer. A balanced formula such as 10N-10P-10K works well, though a lower-nitrogen blend like 5-10-10 works better for flowering and fruiting.
Keep Soil Moist
Container strawberries dry out much faster than plants in the ground, so check the soil about 1 inch below the surface. If it feels dry, it is time to water. Consistent moisture is especially important while fruit is developing.
Roots in containers are more vulnerable to freezing, so in cold climates, move containers to an unheated garage or shed once plants go dormant. Water lightly about once a month, then move them back outside in early spring.
Strawberry Care All Season
Regular care keeps your strawberries healthy and productive.
Successful Watering
Consistent moisture is the cornerstone of good strawberry production. Plants need approximately 1 inch of water per week, with more needed during flowering and fruiting. Letting them swing between parched and soaked directly affects berry quality and size.
Morning watering is preferred so the sun can dry the foliage quickly. This reduces the risk of fungal diseases like gray mold and mildew.
Drip irrigation or soaker hoses are the recommended choice for watering strawberries. Overhead watering creates the perfect conditions for fungal diseases. We can’t do anything about rain, but we can reduce our risk.
Fertilizing Your Strawberry Bed
Strawberries benefit from one feeding in early spring and another at flowering:
- Early spring: Apply balanced fertilizer such as fish emulsion or a 10-10-10 blend.
- At flowering: Switch to a high-potassium fertilizer, such as kelp meal or a 5-5-10 blend. Potassium affects fruit size, sweetness, and overall berry quality.
Expert Tip: Avoid excess nitrogen at all stages, especially from flowering through the rest of the season. Nitrogen creates lush foliage but very little fruit.
Pinching First Season Flowers
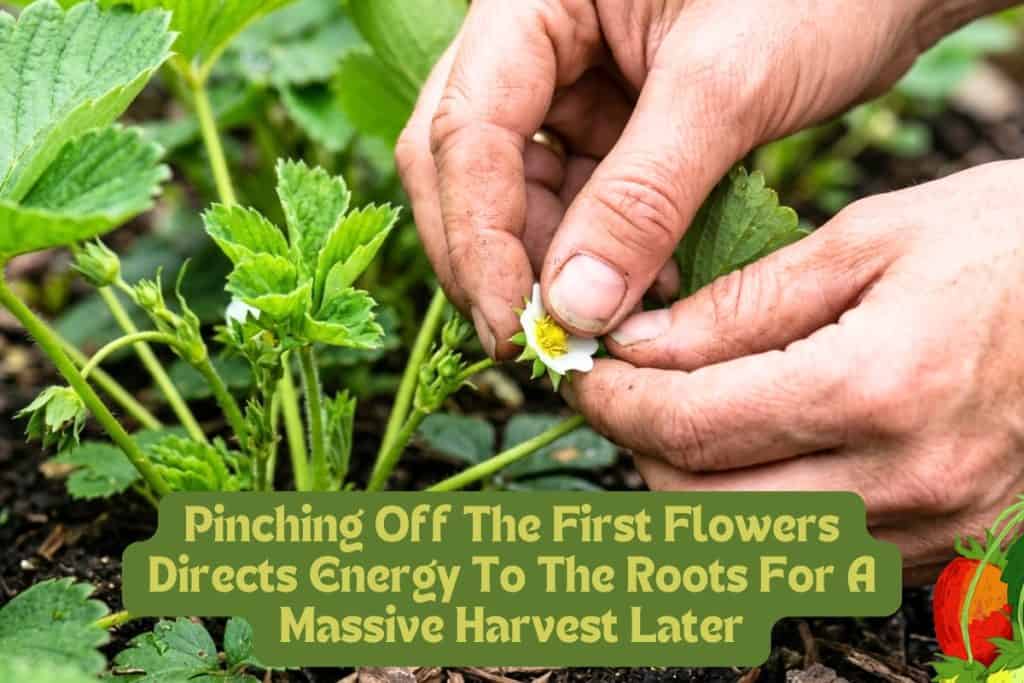
One of the most important things you can do for long-term productivity is to remove every flower during the first four to six weeks after planting. I know this seems counterproductive, but flowers and fruit take energy away from root development, which is critical at this time.
The result will be a stronger plant that will produce dramatically more berries than a plant allowed to fruit immediately.
For day-neutral and everbearing varieties planted in spring, this means sacrificing that first flush of flowers. The payoff is a much more productive plant for the rest of that season and every season that follows.
Managing Runners
Strawberry plants send out long horizontal stems called runners, and each one can form a new daughter plant. Left unchecked, a single plant can yield dozens in one season, so it is best to remove most of them.
Because each runner takes energy away from fruit production, the recommended practice is to remove all but 2 runners the first year and all but 4 the second year.
Pin the node to the soil with a U-shaped landscape fabric pin (or bent piece of coat hanger) to encourage rooting. Once the daughter plant has rooted, cut it from the mother plant and either leave it in place or transplant it to a new location.
Expert Tip: When selecting runners to keep, choose from your healthiest, highest-yielding mother plants. Since strawberry runners are clones of the parent, you are effectively selecting for traits that matter most to you.
Strawberry Pests & Diseases
Most problems can be prevented with good growing practices. Prevention is always easier than fixing a problem after it starts, but it helps to know about common issues and how to handle them.
Birds and Wildlife
Bird netting is the most reliable protection. Lift or remove it during flowering so pollinators can reach the blossoms.
Snails and Slugs
Snails and slugs love moist gardens, but there are a few easy methods to stop them.
- Diatomaceous Earth: DE is a powder made from natural diatom fossils. Sprinkle it around plants to create a barrier that deters snails and slugs. Reapply after rain.
- Beer Traps: Use shallow containers (like tuna cans) sunk to soil level and filled with beer. These attract snails and slugs, which then can’t escape. A safe, chemical-free option.
- Iron Phosphate Bait (like Sluggo): An organic control safe for pets and beneficial insects. Scatter lightly around the garden bed.
Botrytis Gray Mold
This is the most common strawberry disease. It appears as gray fuzz on fruit, especially in high humidity. Prevent it with good airflow, bottom watering, and removing damaged fruit. Apply a copper-based fungicide for control.
Powdery Mildew
This shows up as white, powdery coating on leaves, usually in cool, damp weather. Neem oil works as both a preventive and an early treatment.
Aphids
Aphids come in several colors, but you can identify them by their little “tail pipe” appendages. They cluster on the undersides of leaves. Treat with insecticidal soap or neem oil.
Strawberry bud weevil
Hand-pick these tiny brown weevils with snouts when possible. Organic sprays containing Spinosad, derived from a soil bacterium, are safe and effective for several insects like weevils.
Spider mites
Mites show up in hot, dry conditions, and heavy infestations produce fine webbing. Treat with neem oil or insecticidal soap.
Tarnished plant bug
This insect causes misshapen, cat-faced berries and hollowed-out seeds. Spraying kaolin clay on developing berries creates a barrier that discourages them from feeding.
Best Plants to Grow With Strawberries
Supportive plant neighbors can discourage pests, attract beneficial insects, and improve pollination.
Plant These Near Your Strawberries
- Thyme: A ground cover you can plant between rows to suppress weeds and repel insects with its strong oils.
- French Marigolds: Their powerful smell repels insects and wildlife, while attracting beneficial insects.
- Garlic and Chives: These deter aphids, beetles, and even fungal diseases.
Keep These Away From Your Strawberries
Brassicas (cabbage, broccoli, cauliflower, kale) compete heavily for nutrients and attract harmful insects that move to strawberries.
Nightshades (tomatoes, peppers, eggplant, potatoes) share soil-borne diseases with strawberries including Verticillium wilt (incurable). Keep them in separate beds.
Harvesting Your Strawberries
It’s crucial to know the perfect time to harvest. A common mistake is picking berries too early, when there is still white or green at the tip. A completely ripe strawberry is fully red all the way to the tip, with a slight give when gently squeezed. You should be able to remove it from the stem with almost no resistance.
Harvest every one or two days. Leaving ripe or overripe berries on the plant signals it to slow production and overripe fruit can quickly develop mold.
If possible, harvest in the morning after the dew has dried, but before the heat of the afternoon, for better firmness and longer shelf life. Remove the berry by snapping or cutting, rather than pulling it off.
Store unwashed berries in a single layer in your refrigerator and use them within two to three days. Wash them immediately before eating, never before storing them.
End-of-Season Strawberry Care
What you do after the last berries of the year are picked has a big effect on how well your strawberry plants perform next year.
In spring, pull the mulch back gradually as temperatures warm. Leave some mulch around the plants for frost protection until the risk of a hard freeze has passed.
3 Ways To Prep For Next Season
- Start by removing old, yellowing leaves and trimming the plants back to a few inches above the crown. If you have a large bed, you can use a lawn mower, just be careful with the height of the blade.
- Thin crowded plants. Keep only the strongest plants and remove any runners you don’t want to keep.
- Apply a light layer of compost or balanced fertilizer. Then add 3-5 inches of straw mulch to insulate and help keep winter soil temperatures stable.
Bed Renovation
Even with the best care, strawberry beds naturally become less productive after several years. Original plants age, the bed becomes crowded, and weed and disease pressure builds. When that happens, it is usually best to start a new bed in a different location using rooted runners from your healthiest plants. Avoid replanting strawberries in the old spot for at least two years.
Final Advice
Growing strawberries is one of the most satisfying pursuits in a home garden. Start by choosing a variety that fits your goals and a sunny, well-drained spot. Then prepare your soil, and give your plants consistent care throughout the season. You have the information in this guide with all the details you need to be successful.
Whether you’re growing in the ground or in containers, strawberries are a crop that will repay every bit of effort you invest.
Gardeners have made room in their landscapes for growing strawberries for generations. Welcome to the club. There really is nothing quite like it.
Happy Growing!


6 thoughts on “The Complete Guide to Growing Sweet, Juicy Strawberries at Home”
I want to mix my own soil for strawberries. Do you have a recipe?
Here’s what I would suggest. For containers use a 1:1:1 compost:coir:perlite mix with a bit of slow release feed. For in ground, work 2–3″ of well aged compost into the top 6–8″ and add sand or perlite for drainage in clay or extra organic matter for sandy soils. The main thing is well-drained and plenty of organic matter.
Regarding spring cleanup. Last year I burned 2.5” holes into weed mat and planted everbearing crowns. Removed runners a couple times during the season and again today. The holes where original crowns were planted now have several crowns per hole. Do I need to prune out others so there’s only one or two crowns/plants per hole or just leave them alone?Thanks for your help.
In everbearing (and day-neutral) strawberries, it’s normal for the original plant to form “branch crowns” over time. Those extra crowns are part of the same plant clump and are a big reason your yield increases. I would leave them unless the patch becomes overcrowded. If overcrowded, thin to 2-4 strongest crowns. If crowns branch above fabric, cut the hole bigger.
I have a hanging basket Strawberry plant. I have full sun for it & want to know if when the berries are ready to pick, do i just take off the berry & let it be or cut back the stem they grow on. Also how often to give the plant fertilizer. Thank you. Barb
Harvest strawberries when they are completely bright red with no green or white spots. Unlike some fruits, strawberries do not ripen or get sweeter once picked. Harvest in the early morning by gently snipping or pinching the stem about half an inch above the berry. Baskets are heavy feeders due to the limited soil volume and frequent watering, so always mix liquid formulas at half the strength recommended by the manufacturer. I would fertilize about every 2-3 weeks. I use Miracle Grow in my water. The bag says every 2 -3 weeks and that is what I do. Thanks for visiting. Diane